

By Rina Sklar
Learning to play the recorder is an exciting time in a young student’s life, but for some, a physical limitation or learning disability might make it more of a challenge and can lead to them feeling discouraged. As music teachers, we are always looking to find the best way to help our young students be successful. I hope that this blog post will help you successfully address challenges you are encountering with your students.
When dealing with special learners, there are three things that I want all teachers to keep in mind:
Our goal as music teachers is not to create expert musicians who will make a career out of playing in a symphony orchestra, but to foster a lifelong love of music and of learning. While I always work on reading notation with my students, it is not the be all and end all of teaching music. My main goal is to make sure that my students can successfully make music on recorders. If a student struggles with reading, tracking, language, etc., that’s no problem. What CAN that student do? Can they echo, can they move their fingers, can they read the alphabet? Do they need modified notation, or no notation at all? We can work with that! If your student is missing fingers on their left hand or doesn’t have a left hand: no problem. What CAN they do? Can they use their right hand? Great! Right hand on top for that student and consult an OT for possible music stands to hold the recorder up. Being flexible in our thinking will help both our students and classroom environments by taking some of the pressure off ourselves to do everything “the right way” and instead reframe our instruction for doing everything “the right way for our students”.
In my classroom, I make specific modifications for specific students, but, before I do that, I design lessons with modifications that may assist in the learning of ALL of my students. Why create something to benefit one student when you can design a lesson that will benefit all of them? This way of thinking in lesson planning follows the concepts of UDL, Universal Design for Learning. Some of these UDL lessons focus on the different modalities of learning because each student learns best differently. All learners are special learners. These tools can help ALL STUDENTS!
I’m going to begin with my aural learners. In my mind, the most important part of being a recorder teacher is instilling the foundation of creating a good tone. I work on this before I show them any written notation from their books. I do lots of exercises to get that good tone, starting with singing on “Doo” and then “shutting off your voice” while still singing to get the tonguing and air flow working properly. We don’t “blow” into the recorder: that overflows it with air and causes squeaks. We play imitation games with the recorder trying to imitate the sounds of songbirds (as opposed to crows or seagulls) and learn our first 3 pitches with echo patterns.
From when my students are in Kindergarten, I begin using stories and songs to help them learn the musical alphabet and the positions of the notes on the staff. They learn rhythms through speech and “Rhythm Pies” (a fabulous book by Lenna Harris put out by Macie Publishing) before learning Ta’s & Ti-Ti’s. Once my students are in 3rd grade, we learn how to read notation on the treble clef staff and add in numerical counting. Their rhythm reading is usually very high quality by this point and their ability to transfer this to recorder goes very smoothly. Reading pitches is a little more challenging. My kinesthetic and tactile learners struggle with identifying the difference between notes that are on a line or in a space, because many of them see the white part between the lines as negative space, or blank paper, and not part of the staff where pitches should go. Using a hand staff to identify line and space notes (fingers are lines, spaces in between are spaces), and naming the pitches helps many students, but for those that still can’t “see” it, a foam staff allows students to FEEL the lines as raised areas and the spaces as dips between the lines. Touching the foam board makes the connection. Also, I generally make the 2nd line a different color to represent “G” of the treble clef (and conveniently, you can teach bass clef by flipping it upside down).

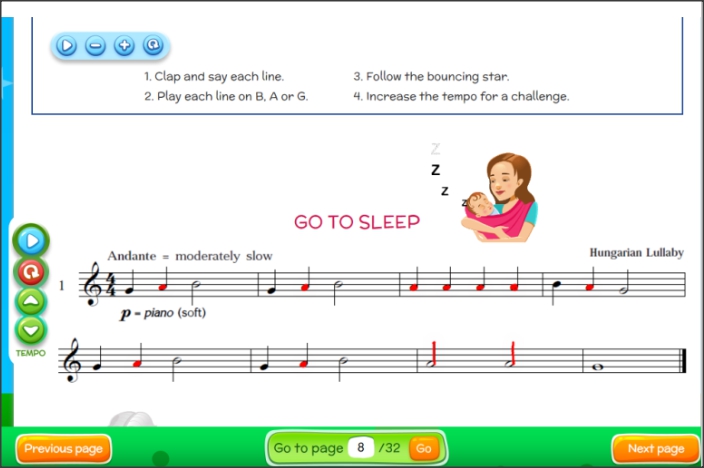
For my visual learners, the most useful tool in my classroom is “joint focus:” having all the students looking at the same thing at the same time. It is important to combine this with a sequential curriculum that gently progresses and takes into consideration the abilities of all learners. I use the interactive “Be A Recorder Star” Curriculum on my Smart Board and have a laser pointer in my class for students to follow along when we are reading notation. This eliminates the question of whether students are able to find the correct note or measure in their books, and also ensures that they are keeping a steady beat when they play. This will help guide their internalization of that beat. I also use modified notation for my beginning players that is easily removable and serves as “training wheels” for my students. I color one pitch on the board: “A”. This makes it very clear visually which note is B, A, or G when they first start playing. Reading notation becomes something most students can do with ease, and soon, I can erase the colored in A’s when they are no longer needed…or, expand to coloring in more notes if students are struggling. I do not write the pitch names above the notation because I find the students are no longer reading the music once you do that.
There are some students who need more support, and I may alter their written books with color-coded notation or even write pitches above the notes (with some way to show rhythms), but I find there are very few students each year that need this kind of modification.
For students who have more fine motor difficulties, I will physically modify their recorders with puffy paint, or hole reinforcement labels to aid their ability to find and cover the holes of their instrument. If I know that I’m not planning to get past B, A, or G with a class, I may cover the thumb hole and first finger hole with a piece of tape to ensure that their “B” will always sound right and they can focus on covering the 2nd & 3rd fingers only.
When I encounter an extreme situation such as a student physically unable to hold a recorder, place fingers on a recorder, or blow into a recorder, etc., I will get a stand to hold the recorder and student covers holes, or I will allow them to play the glockenspiel. I always give the student a choice: you should never force a different instrument on them. Be A Recorder Star offers both Orff Orchestrations and Recorder and Rhythm Orchestrations for hand-held rhythm instruments that can be utilized as well. Most students enjoy the opportunity to play different instruments. You will be surprised what a motivated student will come up with to assist themselves. Let them decide what they can/can’t do.
Remember your goal: to help students make and create music successfully. If you always keep that in the forefront of your thoughts, you will be able to help all of your students!